Sunday, November 14, 2010
Solo Theatre of War Campaign

I'm finally getting enough WW2 stuff painted to play with. Ideally, I'll play mostly with my favorite rules system, Piquet. I've been reading through the Theatre of War campaign book, and decided to sit down and play a solo campaign using my new troops.
Originally, I started browsing maps around Utah beach, trying to find something that showed enough geography to provide movement info yet not enough writing on it to make it difficult to use. I finally decided I was making it way too hard on myself and just made a random map. This is one row taller than the default map size suggested in ToW. Each map square has a large number in the middle indicating the movement cost to move into that square. Square with cost 6 have a random edge that is impassible. Each square has a smaller number which is the victory points for that square.
One of the interesting things about ToW is that it's designed to use around your collection, whatever it is. You create a roster of all your units. It works out that I have enough US Airborne painted up to field a parachute regiment reinforced by a couple of companies of armor. With the off-board artillery (the regiment's 75mm battery, and the division's 105mm battery), that's 14 units. The Americans in '44-45 tend to have better commanders and sequence decks, and are thus the smaller force. Using a little bit of math and the Point of Attack: Blitzkrieg book, ToW tells me I need about half again as many Germans. I scrape together 18 units of Germans which look like a regiment of infantry, the divisional AT battalion, an attached Panzer IV battalion, and the off-board artillery.
Each side may now assemble battlegroups on the map-- up to 10 groups with a minimum of one strength point each, or up to four strength points. There may also be three dummy markers. Each battlegroup has an individual command rating, but contains units from this same roster. When the unit is placed on the table for a battle, it gets a random selection of units from that roster based upon not just its size in strength points but also the tactical situation on the campaign map.
Each side also calculates National Will Points-- this is basically your will to fight and how you win or lose the campaign. The Americans drew an impress 76 points, while the Germans had a measly 44.
I split the Airborne up into six battlegroups-- unit I with strength four, F and H with strength two, and A and D with only strength one. The were set up in the bottom three rows. For the Germans, I threw out six battlegroups. Once I scouted them or got into a battle with them, I would roll to see if they were dummy markers or, if real battlegroups, what their relative strength was.
The campaign is played much like a standard Piquet wargame. Each side has a Sequence Deck tailored to their force which contains cards such as Campaign Movement (Light). Both sides roll for Initiative Points and use those points to draw and play cards from their deck. Unlike most other Piquet games, in ToW, you manage a hand. Since this was early-mid June 1944, or a Summer time period, the hand size was the largest at six cards (versus four for Winter campaigning). In the above example, it would cost one Initiative Point to draw the Campaign Movement card, then one point to play it. Once played, every battlegroup could act on it. Campaign Movement (Light) lets a battlegroup move into a map square with movement cost 1-2 by spending the same amount of Initiative. There are equivalent Medium (3-4) and Heavy (5-6) movement cards.
One opposing battlegroups are in the same map square, one or the other may initiate a tabletop battle by playing an Engage in Battle card. Both sides then assemble a Battle Hand from their current hand of cards. A Battle Hand contains an Actions card, Attack, Defend, Retire and Flank Attack, indicating their tactic for the upcoming battle. If the defend has no Action card in their hand, they default to Defend. The force can bolster their tactical position by playing extra copies of the same Action, or playing Strength cards.
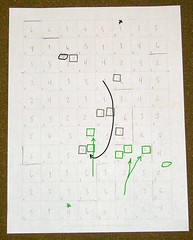
I played through the decks, or one entire turn, without making contact. At some point, I started misreading the map-- thinking the movement costs were victory points, I started running the battlegroups of both forces into the bad going! Typical upper echelon foul up!! Despite setting up some temporary supply depots (circled on the map) and having respectably short supply lines, the American group H was caught out of supply. Measuring the shortest path back to the American base of operations (the bottom row square with the asterisk) shows their supply length to be two. To remain in supply once a Supply card is played, he has to roll above that on a d20. He got a two. Since he was out of supply, 10% of his units will be slightly worse quality until he regains supply. He also may not advance.
The Americans played a couple of Scout cards, and determined that that the German battlegroup G was strength three, and battlegroup I was strength four! Clearly, the German schwerpunkt was rolling down the easy mobility center of the map, probably an undamaged road nexus, right between the two thrusts of the Airborne.
Early in the second turn, the Germans showed an Engage in Battle card, along with two Attacks and a Strength. They held onto it until they could throw strength three battlegroup G into the out of supply battlegroup H-- only a strength two unit. The odds looked good from the German perspective, but the odds wouldn't be overwhelming, as the American Battle Hand was an identical two Attacks and one Strength. Attack vs. Attack...the upcoming battle would be an Encounter battle...
Subscribe to:
Post Comments (Atom)
No comments:
Post a Comment